April 17, 2011
Pylon - assembling the axle
April 09, 2011
Pylon progress
So yes, it's been a while, but at long last I've been making progress. The thing with pylons is, they're big. If you want to take them with you, you pretty much have to go flat-packed. Like so:
On the pylon side, I drilled 3 roughly equidistant holes, glued the magnets in, waited for everything to dry, and then added a spot of paint on top of the magnets. I pressed the other part while the paint was wet, which gave me the place to drill…
… I then drilled where the paint was, put on more magnets (taking care I got the polarity right), and here we are:
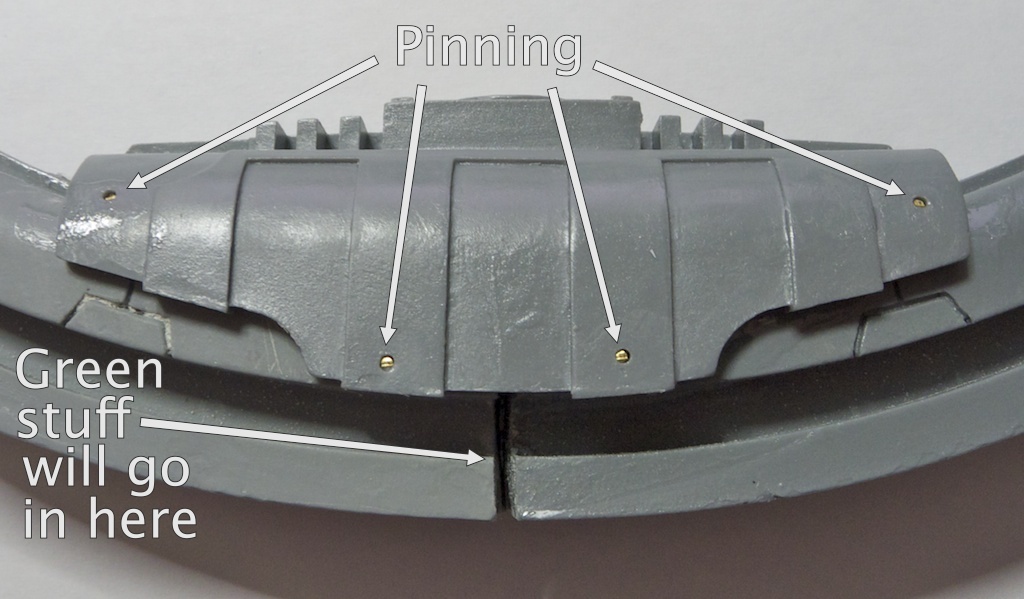
While I was at it, I assembled the centre of the pylon: glued the 3 parts together, then added 1mm brass rod in 4 places. The rod is not flush, the idea is to fill the hole with a bit of green stuff. It was quick to do, and ensures the thing will not break apart. The joint in the middle will be filled with green stuff as well - easier than spending time trying to get the two parts fit exactly.
February 27, 2011
Back to the pylon
So it's been a long while, but at long last I'm back with the pylon. First step is to build the base. I've pinned the legs, using a cunningly crafted template to ensure the holes match on both sides. It certainly helps speeding things up too, as this needs to be repeated for all 6 legs.
One side of the template is marked 'hub', the other 'rim', to help ensure I don't drill the holes the wrong way around. An alternate method would be to drill the guiding holes in the exact centre of the template, but I could not be bothered.
And that's all for now.
January 08, 2011
Distraction
Then, the legs - 4 sprues with 6 legs each. Only 20 are needed, the extra number is to help with posing – which is nice.
One other sprue holds 2 mandibles (extreme left), and 20 "tertiary velocitators" – small legs going in between the main ones.
Last, the manipulators. This is the part I had most trouble with, I found them quite fragile. The good news is that as they are very light, any breaks can easily be glued back.
The documentation provided by ForgeWorld is quite good, just thought I'd expand a bit on the assembly of the forcipules. The below picture indicates how all the bits fit together.
December 31, 2010
Drat…
December 28, 2010
Pylon
To get us started, I'll try to document my building of a Necron pylon. First things first: you'll need to verify you've got all the bits in the kit, clean the pieces using cold soapy water, straighten any bended bits with warm water, and remove the extra bits of resin, using a combination of saw, Dremel, and sand paper (usual warnings apply: resin is toxic, wear a mask and protect your eyes). In the pictures below I've marked in purple all the bits to be removed. Note: I start with the cleaning and then do the sanding, and have not had any issues with peeling paint. Others will prefer to sand first and clean later.