February 05, 2012

You can't win them all

So I was going to ApocaFez, with 6 pylons and 7 monoliths, and I was expecting them to get blasted to pieces (as it turns out, I needn't have worried, I only lost a couple of pylons and one monolith). So – I needed craters. Serendipitously, From The Warp posted a cool tutorial on how to make craters on the quick. So off I went, cutting cardboard shapes and then outside in the freezing weather to paint the things with Gorilla Glue. So far, so good. Once it was all dry, I added more glue to the sides and went back inside the house. A couple of hours later, as night was falling, I went outside again to pick the craters up. The results were a little bit disappointing – the glue had not raised that much; but I figured it would be good enough and relocated the craters into the bathroom to leave then to dry a bit (what with the evening fog that was rising). Did I say fog? Like, water? When I came back to the bathroom half an hour later to check whether the glue had fully dried, I was presented with the horror below. Looks like outside mist + inside warmth made the glue want to party.
I wonder, what with the rumours of 6th Edition and Chaos getting a revamp, is this a sign that I should start a Chaos army?

(Epilogue: I did paint a few craters in the end, from Amera, which were put to good use.)


January 28, 2012

ApocaFez January 2012

We had a small game last weekend, at Warhammer World, for a friend's birthday. Pics are on flickr, here.

September 27, 2011

Gamesday 2011

Went to Gamesday last Sunday, some pics can be found here. On the queuing fun, have to say GW were quick to apologise – got an e-mail from the CEO today promising this won't happen again.

August 14, 2011

ApocaFez Summer 2011

Another Apocalypse game has come and gone. The pics I took can be found here.

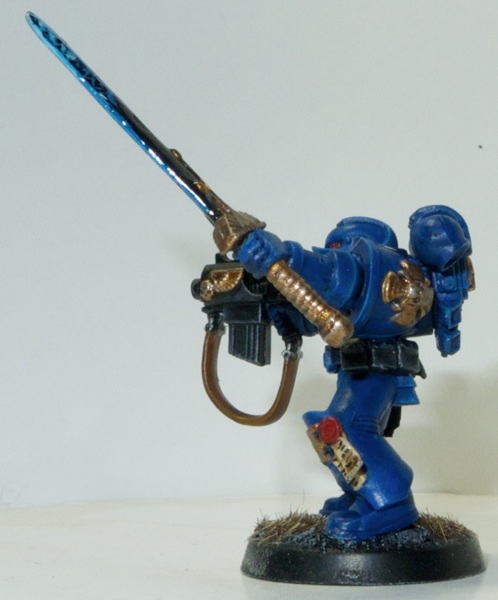
A Space Marine

So young Eddie, master organiser of Apocalyptic delights, sent the below to a few of us back in April:

"Hello all. I'm formulating an Apoc formation for Chapter master P-Fisty's honour guard - and I hit upon the idea of getting all my hobby heroes to paint a marine to represent them! As such, if you want too, will you be in my honour guard?

Each marine has artificer armour, a boltgun, bolt pistol and power weapon. You can swap for a relic blade, and also have the option for a auxiliary grenade launcher! All I ask is you paint the right shoulder pad black for me to put the storm legion icon on."

So, below is my contribution. I painted a Space Marine, I feel dirty…

(If anyone is interested I can detail how I painted it, but to first put credit where it is due, I lifted the gold painting method from All Things 40K, and the power sword scheme from From The Warp - except they both do it much better than me).

A Space Marine

A Space Marine

A Space Marine

A Space Marine

A Space Marine


July 19, 2011

Pylon - assembling the cannon

 
Onto the final assembly stages.
 
(note: the part names I use below all come from the pylon assembly document which Forgeworld kindly provides with the kit)
 
Fist, glue the main crystal clamps to the gun rail. So far so easy.
 
 
Then glue the cannon to the gun rail. You'll notice a gap between the clamps and the cannon. Do not try and glue them as is – with the tension all you'll get is parts separating again promptly. Rather, use the resin worker's best friend: the hair dryer. A few quick passes over the clamps and they'll be soft enough that they can be bent into placed and glued.
 
 
Maintain them in place while they cool down (it doesn't take very long). Presto, a strong joint.


(note: be gentle with the hair dryer, you don't want to melt the resin. The bottom of the clamp has a hollow where the green plastic rod goes - this is quite a thin part and can easily collapse on itself.)
 
Onto the cannon muzzle. As you'll see below, the thing does not fit nicely onto the crystal.
 
 
Back to the hair dryer it is. You'll have to hold the muzzle if you don't want it to get blown halfway across the room. Unfortunately the hair dryer expels rather hot air. I've found that holding the piece to warm up between two layers of kitchen roll will keep your fingers nicely cool.
 
 
Again the above advice applies: don't overuse the dryer! Better to do several passes until the muzzle is flexible enough to fit onto the crystal, using gentle pressure. Just maintain it in place until it's cold, then glue it on.
 

For the last part, the side crystal clamps, follow the same process as before. They will likely be too short, a gentle spot of warming (again, use kitchen towels to hold them) will ensure they glue in nicely.
 
 
And that's it. The pylon assembly is complete.
 
One last tip: the turntable will likely be loose inside the base centre, resulting in a leaning pylon. Just stick Scotch tape onto the turntable until you get a good fit. The tape is thin enough that you can get quite precise results. I would not advocate using thicker tape here (like electrical tape).


May 03, 2011

ApocaFez - January 2011

Hey, our big game at Warhammer World back in January has made Games Workshop's Facebook page!

As the pics they're linking to are mine, thought I'd relink to them: here for day 1 and here for day 2.

Now to get back to the prep for the August encore…