5 immortals with Tesla carbines, speed painting at its best (or worst, really).

Showing posts with label Warhammer. Show all posts
Showing posts with label Warhammer. Show all posts
March 02, 2014


July 19, 2011
Pylon - assembling the cannon
Onto the final assembly stages.
(note: the part names I use below all come from the pylon assembly document which Forgeworld kindly provides with the kit)
Fist, glue the main crystal clamps to the gun rail. So far so easy.

Then glue the cannon to the gun rail. You'll notice a gap between the clamps and the cannon. Do not try and glue them as is – with the tension all you'll get is parts separating again promptly. Rather, use the resin worker's best friend: the hair dryer. A few quick passes over the clamps and they'll be soft enough that they can be bent into placed and glued.

Maintain them in place while they cool down (it doesn't take very long). Presto, a strong joint.

(note: be gentle with the hair dryer, you don't want to melt the resin. The bottom of the clamp has a hollow where the green plastic rod goes - this is quite a thin part and can easily collapse on itself.)
Onto the cannon muzzle. As you'll see below, the thing does not fit nicely onto the crystal.

Back to the hair dryer it is. You'll have to hold the muzzle if you don't want it to get blown halfway across the room. Unfortunately the hair dryer expels rather hot air. I've found that holding the piece to warm up between two layers of kitchen roll will keep your fingers nicely cool.

Again the above advice applies: don't overuse the dryer! Better to do several passes until the muzzle is flexible enough to fit onto the crystal, using gentle pressure. Just maintain it in place until it's cold, then glue it on.

For the last part, the side crystal clamps, follow the same process as before. They will likely be too short, a gentle spot of warming (again, use kitchen towels to hold them) will ensure they glue in nicely.

And that's it. The pylon assembly is complete.
One last tip: the turntable will likely be loose inside the base centre, resulting in a leaning pylon. Just stick Scotch tape onto the turntable until you get a good fit. The tape is thin enough that you can get quite precise results. I would not advocate using thicker tape here (like electrical tape).

April 21, 2011
Pylon – fixing the focussing array
The focussing array is them six "whiskers". I have tried a number of methods for fixing them.
For the first pylon I built, I went with magnets (two per). Unfortunately, they were not that strong and I ended up with some droopy whiskers. So at the last moment I added a pin (that's the whisker to the left below). For the second pylon, I went with two pins and no magnets (right, below). This one makes for a sturdy link, however each time I put the whiskers on I'm a bit concerned that I'll damage the holes.

First try (left) vs. second try (right)

First try (bottom) vs. second try (top)

First try - 2 magnets and a hole
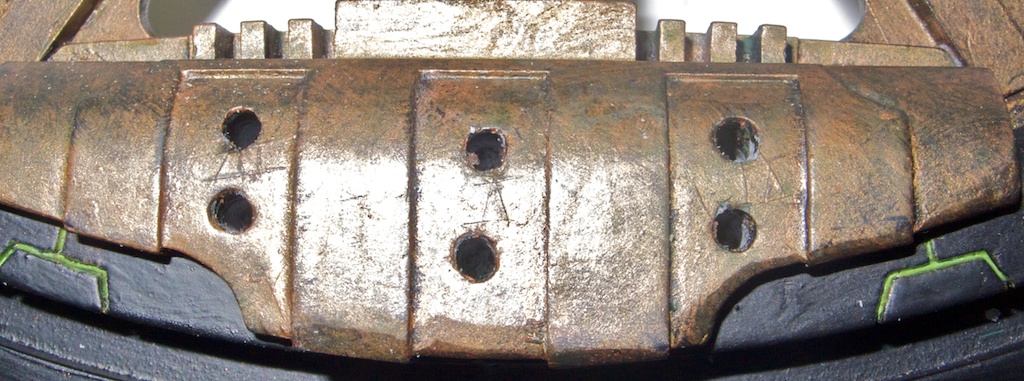
Second try - 2 holes
For the third pylon, I decided to go back to magnets – because if I can't magnetise something, I get that very annoying feeling that I've failed somehow. This time around however, I went with rod magnets (1/8" x 1/4"), so I get the benefits of pins as well. So far, so good…

Rod magnet, half-sunk into the whisker

There are magnets inside the holes - these ones are 1/8" x 1/16".
April 20, 2011
Arac Attack!
I undercoated a bunch of scarab swarms outside this morning and then left them to dry. When I came back, they were under attack! Aw, aren't these itsy bitsy spiders the cutest little things?

It's not the first time the local arachnids have taken an interest in my Necrons. Below is a much larger critter that decided to visit my first pylon. It does look a bit drowsy (well that paint does emit some serious fumes), but went away alright in the end.

(and then people wonder why I'd rather stay inside…)

It's not the first time the local arachnids have taken an interest in my Necrons. Below is a much larger critter that decided to visit my first pylon. It does look a bit drowsy (well that paint does emit some serious fumes), but went away alright in the end.

(and then people wonder why I'd rather stay inside…)
April 17, 2011
Pylon - assembling the axle
There are 3 parts to fit together. They have all been primed with Chaos Black, followed by a dry brush of Dwarf Bronze, and a light wash of Thraka Green.
So one of these:

And two of those:

First, I removed the extra paint so the glue bonds to the resin, and not the paint. A Dremel with appropriate bits helped here. An added advantage is that I got a rough surface, which makes for a stronger joint.
For an earlier pylon, I'd used blu-tack to mask the parts I did not want to paint, that works too.


The glue goes in the axle's groves, and the guides get prepped with a primer/accelerator (I use Filla-Glu and their very convenient Kicka-Pen).

In order not to get nasty surprises during the final assembly, I fit the pylon onto the axle while the glue dried.

One final note on pinning: tempting as it might be, do not pin. On an earlier pylon, I pinned where the arrows are in the picture below. All I got was a weaker piece, which snapped in two during my first game with it. I've stuck with just glue since, and haven't had a single problem.

April 09, 2011
Pylon progress
So yes, it's been a while, but at long last I've been making progress. The thing with pylons is, they're big. If you want to take them with you, you pretty much have to go flat-packed. Like so:

So what I've done is cut the tip of the pylon with a hacksaw, drilled some holes, and glued magnets in (in this case they're 3x2mm, ensuring a nice powerful fit).
On the pylon side, I drilled 3 roughly equidistant holes, glued the magnets in, waited for everything to dry, and then added a spot of paint on top of the magnets. I pressed the other part while the paint was wet, which gave me the place to drill…

… I then drilled where the paint was, put on more magnets (taking care I got the polarity right), and here we are:

Here is the result, on one of my older pylons (I've managed a tighter fit this time around):


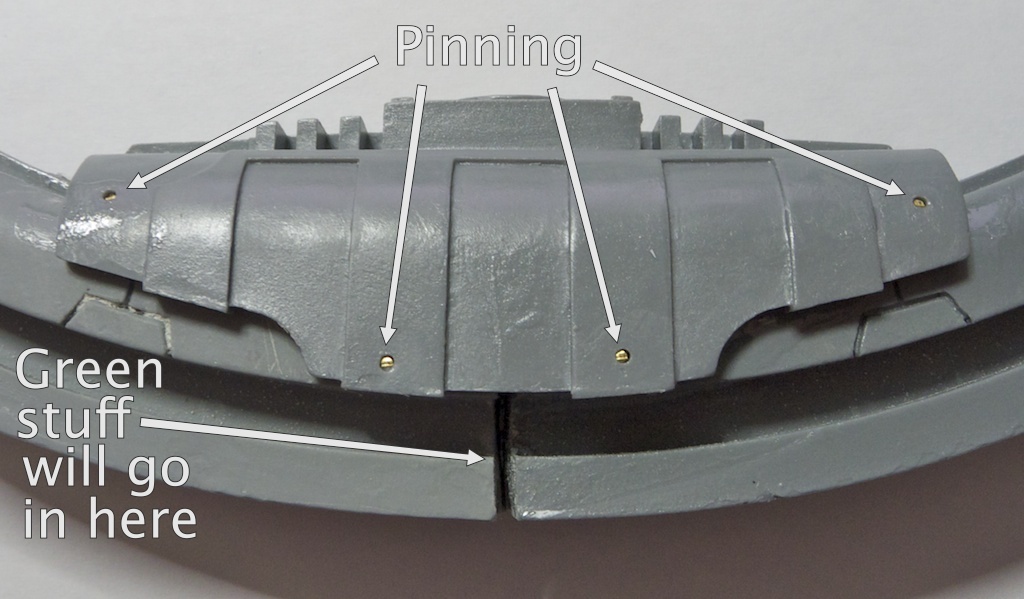
While I was at it, I assembled the centre of the pylon: glued the 3 parts together, then added 1mm brass rod in 4 places. The rod is not flush, the idea is to fill the hole with a bit of green stuff. It was quick to do, and ensures the thing will not break apart. The joint in the middle will be filled with green stuff as well - easier than spending time trying to get the two parts fit exactly.
February 27, 2011
Back to the pylon
So it's been a long while, but at long last I'm back with the pylon. First step is to build the base. I've pinned the legs, using a cunningly crafted template to ensure the holes match on both sides. It certainly helps speeding things up too, as this needs to be repeated for all 6 legs.
One side of the template is marked 'hub', the other 'rim', to help ensure I don't drill the holes the wrong way around. An alternate method would be to drill the guiding holes in the exact centre of the template, but I could not be bothered.


The leg side of things:


And that's all for now.
January 08, 2011
Distraction
I was ready to get started again on the pylon, but my plans got changed when I received my latest ForgeWorld order. Onto the Tomb Stalker.
There are quite a few bits in the kit. First, the body parts: the head, the tail, and 10 segments.

Then, the legs - 4 sprues with 6 legs each. Only 20 are needed, the extra number is to help with posing – which is nice.

There are 5 sprues with 4 leg claws each (top of the below pic), and 2 holding an "energy forcipule" (the gauss weapon), and an antenna (bottom). Note there is a hole towards the tip of the blade, this is not a bubble, it is used to help glue the gun muzzle in place.

Then come the other bits used to fully build the forcipules. I've added a quick note below on how it all fits.

One other sprue holds 2 mandibles (extreme left), and 20 "tertiary velocitators" – small legs going in between the main ones.

Last, the manipulators. This is the part I had most trouble with, I found them quite fragile. The good news is that as they are very light, any breaks can easily be glued back.

The documentation provided by ForgeWorld is quite good, just thought I'd expand a bit on the assembly of the forcipules. The below picture indicates how all the bits fit together.

The result:

December 28, 2010
Pylon
To get us started, I'll try to document my building of a Necron pylon. First things first: you'll need to verify you've got all the bits in the kit, clean the pieces using cold soapy water, straighten any bended bits with warm water, and remove the extra bits of resin, using a combination of saw, Dremel, and sand paper (usual warnings apply: resin is toxic, wear a mask and protect your eyes). In the pictures below I've marked in purple all the bits to be removed. Note: I start with the cleaning and then do the sanding, and have not had any issues with peeling paint. Others will prefer to sand first and clean later.


July 18, 2010
Yes, I know I shouldn't have…
I'm very sorry. These two have been on my desk for the past couple of days, and I couldn't resist.

July 15, 2010
Skaven Packmaster

Well I had to start somewhere with painting my Skaven army, so here is the first one, step by step:
- Apply Khemri Brown to the fur
- Apply Orkhide Shade to the cloak
- Apply Calthan Brown to the shaft of the things-catcher
- Apply Boltgun Metal to the helmet and the metal bits of the things-catcher
- Apply Snakebite Leather to the purse, belt and wrist bands
- Apply Mechrite Red to the lips (so the rat looks like it’s in a bit of a frenzy)
- Apply Dheneb Stone to the teeth and the claws on the feet
- Dry brush the fur with Dheneb Stone
- Apply Dwarf Flesh to the ears, snout and tail
- Dry brush the shaft of the things-catcher with Vomit Brown
- Dry brush the cloak with Gretchin Green
- Apply Camo green to the whip
- Dry brush the whip with Rotting Flesh
- Apply Snakebite Leather to the whip’s bindings
- Apply Boltgun Metal to the whip’s spikes
- Wash the cloth with Baal Red
- Wash the fur, shaft of the things-catcher and all leather bits with Devlan Mud
- Wash all the metal bits with Badab Black
- Wash the fleshy bits (ears, snout and tail ) with a mix of Ogryn Flesh and Devlan Mud (about 60/40 mix)
- Wash the whip with Thraka Green, then with Devlan Mud
- Dry brush the metal bits with Mithril Silver
- Apply Bestial Brown to the base
- Dry brush the base with Vomit Brown, then Bleached Bone
- Apply Vermin Brown to the sides of the base
- Apply varnish to the mini
- Add flock to the base to taste


Subscribe to:
Posts (Atom)