Showing posts with label Terrain. Show all posts

September 24, 2012

Necron goodness at Gamesday 2012

So, to get a few things out of the way:

  • The retail zone this year was amazingly well organised (actually, the entire Gamesday was a superb experience). There was plenty of space, the queues were long but moving quickly, there were far less grumpy customers (but some people can never be pleased…), and as a result the staff were far less stressed than in previous years – cashiers with a genuine smile at Gamesday, who would have thought? Following several years of intense frustration, a big Thank You to the organisers, for having listened and come up with a very good retail experience.
  • Yes, the Horus Heresy book was there. There were plenty available, and it is a very nice book. Far from cheap, but the quality of the book (and the contents!) make is well worth it.
  • Plenty of good stuff as per ever, amazing gaming tables, super enthusiastic GW & Forgeworld folks, the works.
  • At the Black Library I bought The Emperor's Might (and got it signed by John Blanche!), it is a superb book. It's even got some Necrons in it…
But the most important stuff (for this Necron fanatic anyway) was to be found at the Forgeworld stand. We know that the next Imperial Armour will feature Necrons, the Minotaurs and the Imperial Guard. No firm dates on publication, but April 2013 is a possibility.
 
 
 And below is a few of the Necron-y goodness we might find within when the book is finally released (there was also a folder of concept art to be perused, it's fair to say there is a bit of an obsession with insectoid forms for the Canopteks. Also, plenty of flyer concepts – yummy!)


The Necron Night Shroud:
 
 
The Necron Tesseract Ark:
 
 
The Necron Sentry Pylon:


 And terrain! One of FW's goals is to try and do dedicated terrain for the various xeno races, and the below might also make its way into IA12 (if it's finished in time). FW would also love to re-issue / create new Tyranid terrain, however there are severe technical difficulties with it, as the organic forms are pretty much impossible to remove from the molds.

Even if this Necron board section never gets released, it remains a good inspiration for custom-built terrain:


 As for my immediate future, I purchased a few Acanthrites. They should keep me busy for a while…


June 10, 2012

New Apocalypse game means more craters!


So I went to Salute 2012 back in May, and met Andrew from Amera Plastic Mouldings. Following on my earlier disaster attempt to build apocalyptic craters, he very kindly agreed to show me how the professionals do it. I now have 20 of the very nice craters below, all that's left to do is trim and paint them. And if you want to buy some, Amera sells them here.
Our next Apocalypse game is scheduled for August 19, time to stop procrastinating and build some more Necrons!


February 05, 2012

You can't win them all

So I was going to ApocaFez, with 6 pylons and 7 monoliths, and I was expecting them to get blasted to pieces (as it turns out, I needn't have worried, I only lost a couple of pylons and one monolith). So – I needed craters. Serendipitously, From The Warp posted a cool tutorial on how to make craters on the quick. So off I went, cutting cardboard shapes and then outside in the freezing weather to paint the things with Gorilla Glue. So far, so good. Once it was all dry, I added more glue to the sides and went back inside the house. A couple of hours later, as night was falling, I went outside again to pick the craters up. The results were a little bit disappointing – the glue had not raised that much; but I figured it would be good enough and relocated the craters into the bathroom to leave then to dry a bit (what with the evening fog that was rising). Did I say fog? Like, water? When I came back to the bathroom half an hour later to check whether the glue had fully dried, I was presented with the horror below. Looks like outside mist + inside warmth made the glue want to party.
I wonder, what with the rumours of 6th Edition and Chaos getting a revamp, is this a sign that I should start a Chaos army?

(Epilogue: I did paint a few craters in the end, from Amera, which were put to good use.)


September 23, 2009

Bastion (a work in progress)

So I’ve started on my bastions. Progress is very slow but hey, I’ve been on holiday…The bolters: I pierced the tip of the guns first, then undercoated Chaos Black, drybrushed Boltgun Metal, and washed with Badab Black. The tip of the guns were further washed with Devlan Mud, then Badab Black again. Then varnished with Vallejo Matt Varnish.

Heavy Bolter

The gun turrets: Chaos Black undercoat, Boltgun Metal drybrush, and Badab Black wash. Added a bit of detail on the skulls, then Matt Varnish.

Gun turret

Bastion stage one – undercoat of Chaos Black and 2 coats of Catachan Green.

Bastion

Bastion stage two – added a drybrush of Camo Green.

Bastion

Bastion stage three – added a wash with Badab Black. Then sealed with Purity Seal.

Bastion

As I said, it’s in progress… I’ve only completed one section yet.

April 12, 2009

My first crystal

My first attempt at terrain. The base is about 4 inches wide. Base is 10mm-thick foam card, plastered over then based. Crystals are foam, painted over as per the codex. 

Crystal

Crystal

April 07, 2009

The gaming table

So I got tired of losing.

I play Necrons, my son plays Tyranids.

I’ve got a shooty army, he wants close combat, so playing on the dining table (3x5 ft.) is all to his advantage. However I’ve got an ace, in the form of basic woodworking skills. So last week I decided to build a proper 4x6 ft. gaming table. I had a number of requirements:

  • it had to be easy to assemble and disassemble,
  • it needed to fit on top of the dining table (and the garden table, luckily they’re both the same width - 3 ft.),
  • it should not slip while playing,
  • and ideally it should have have a border (to be nice to Arzhel, who has a tendency to throw the dice too hard: they end on the floor and the house rule is that in that case they are ignored).

So off to B&Q I went, where I purchased some MDF, that they nicely cut in 2x2 ft. blocks for me, and in the afternoon I went to work. The results are below:

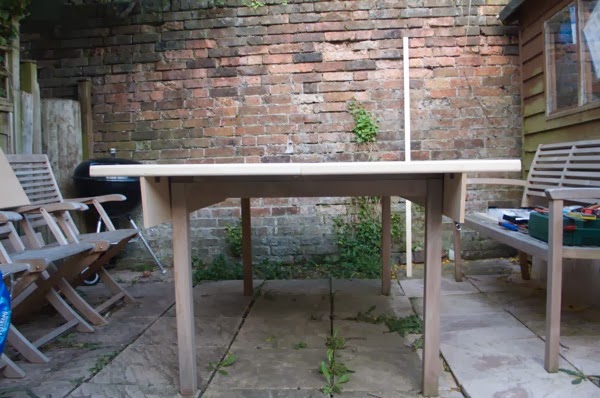
The garden table:

Garden table

The board, packed and ready to go:

Packed board

Deployed on the table:

Deployed

And with the gaming mat on top:

With the gaming mat on top

Some details: I installed ‘side wings’, which are collapsible for storage, and help the board to nicely hug the table, preventing it from moving during play:

Side wings

The board upside down, to show the ‘wings’:

Side wings

The side sections are assembled using dowels, these are obviously not glued in:

Dowels

I added hooks to make sure everything stays together once assembled:

Hook

Little bit of finition. I could not be bothered with using a mitre saw and box, so ended up sanding the corners.

Corner

All that’s left to do is to paint it, and play! I can’t lose now.